DIY Thermostat with a Raspberry Pi
I made a thermostat using a Raspberry Pi. It cost about $100, works great, and looks awful. I learned a lot and bothered lots of people by talking about it too much.
But Why?
My apartment is nice, but there’s something I don’t like about it: the AC and heat is loud (exposed ductwork isn’t great for noise). On top of that, the thermostat turns on and off frequently, with cycles that are generally about 10 minutes. This means that watching a movie in the summer is an exercise in frustration, requiring volume adjustments about every 5 minutes.
I looked for a way to change the temperature tolerance of the thermostat, because I don’t really need the temperature to always be within +/-0.5°F of the set temperature, but that wasn’t adjustable. I thought about buying a smart thermostat, but they’re expensive.
Thus, I entered a train of thought that began with “what if I just did it myself?” and ended with, well, doing it myself.
Research Phase
I started with the assumption that I could use a Raspberry Pi as the main controller for my thermostat. They’re cheap (less than $50, including accessories), the newer models have WiFi built-in, and they have super handy GPIO pins that are perfect for interacting with other electronics. So, the plan was to have a Raspberry Pi, with a web interface for control, doing… something that would allow thermostat-like behavior.
The first question is: how will the Pi know what the temperature is? I had a few DHT11 sensors lying around, but they have an accuracy of 2°C (3.6°F), which isn’t really accurate enough for use in a thermostat. The DHT22, on the other hand, has an accuracy of 0.5°C (0.9°F), which is probably fine. I also considered the SCD30, which measures temperature, humidity, and CO2 levels (cool, right?) but is much more costly. I ended up going with the DHT22.
The next question is: how do we control a thermostat from a Pi? It turns out, it’s fairly simple. There’s a good, in-depth explanation here, but here’s a summary: there are a bunch of control wires that go from the HVAC unit to your wall thermostat. The simplest unit—a heater—has two wires, R and W. If you connect the R wire to the W wire, the heat turns on. If the unit has AC as well as heat, it will also have a Y wire, and connecting the R wire to the Y wire turns the AC on. It’s basically just “connect this wire and that wire,” and which wires to connect depends on your HVAC unit. This means relays are the way to go for control (the reason you can hear your thermostat “click” on).
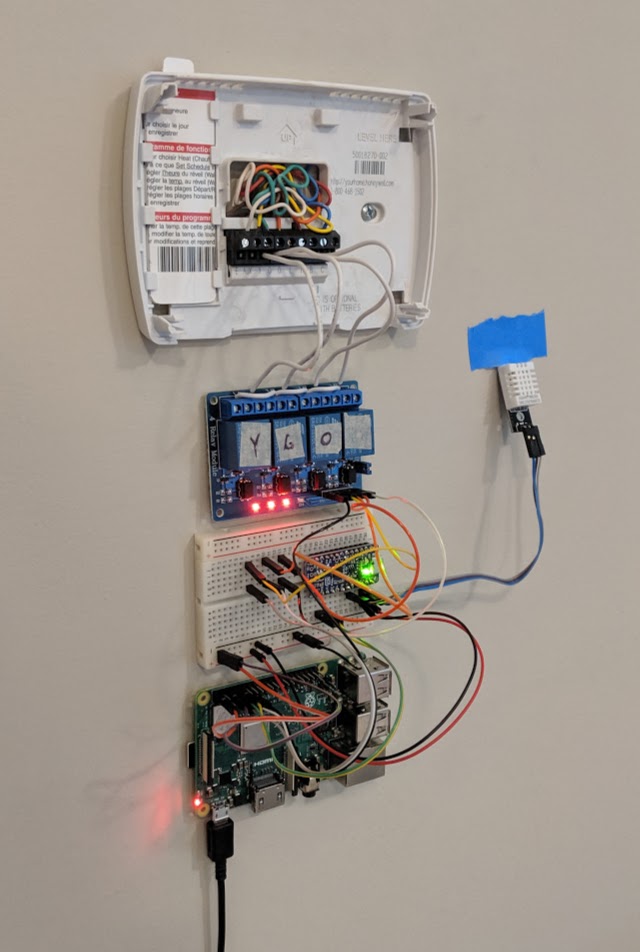
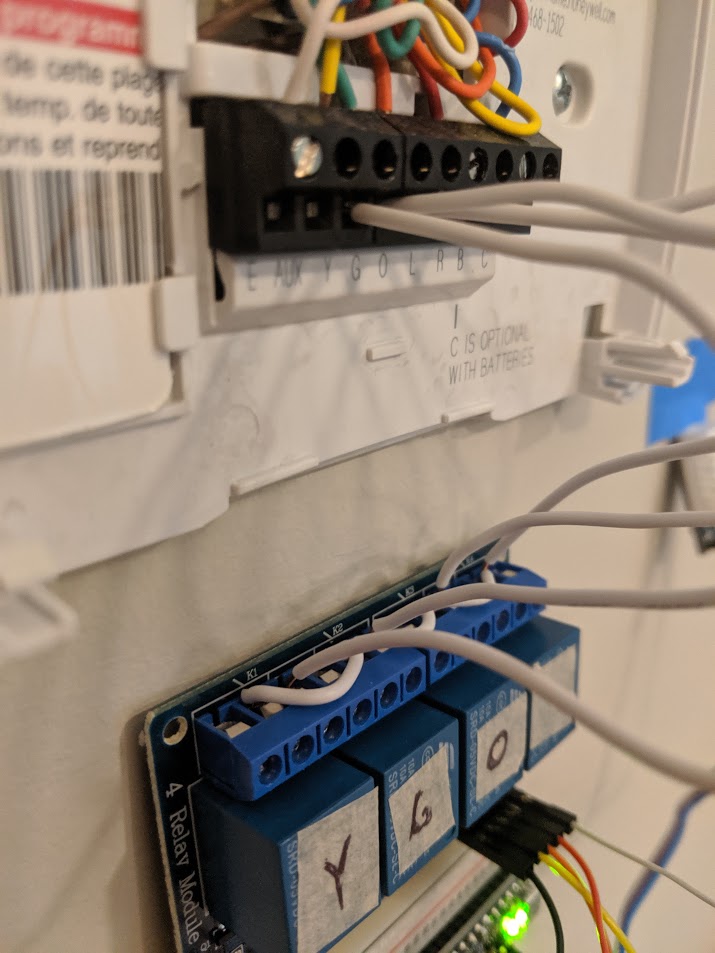
To find out how to interact with the control wires, I did some prodding with a multimeter on the thermostat that I already had. It turns out that my particular system is a bit odd; it doesn’t have a heating wire connection (W), but instead, the only wired connections were AUX (auxiliary heating), Y (compressor), G (fan), O (heat pump reversal valve), R (24VAC), and C (power). I didn’t need auxiliary heating, and C is for constant power (24VAC), which I didn’t need either because it was easier to just plug the Pi into the wall to power it. In the end, I found what I needed to know: turning the AC on means connecting the R, Y, G, and O wires together. Turning the heat on means connecting the R, Y, and G wires (but not O). Turning on only the fan is done by connecting R and G. In short, turn on the compressor and blower fan to get heat. Also turn on the heat pump reversal valve if you want AC instead.
Armed with knowledge about what sort of switching I’d need to do, I looked around for relays, and ended up using a SainSmart 4-channel relay module ($10). This can be controlled directly from the Pi’s GPIO pins. It’s active low, so connecting an output pin from the Pi to the relay module would switch on the relay if the output pin was low, and switch it off if it was high. Slightly confusing, but that’s fine.
Assembly
I bought the parts I needed:
- Raspberry Pi Model 3 B+ ($35)
- 5V 2.5A MicroUSB wall wart ($7.50)
- Any decent SD card ($10)
- DHT22/AM2302 ($10 for 2-pack)
- 4-channel relay module ($10)
- Breadboard, jumper wires, multimeter, misc. junk from Sparkfun ($20-30)
- Pro Trinket 5V 16MHz ($10)
- Total: roughly $100
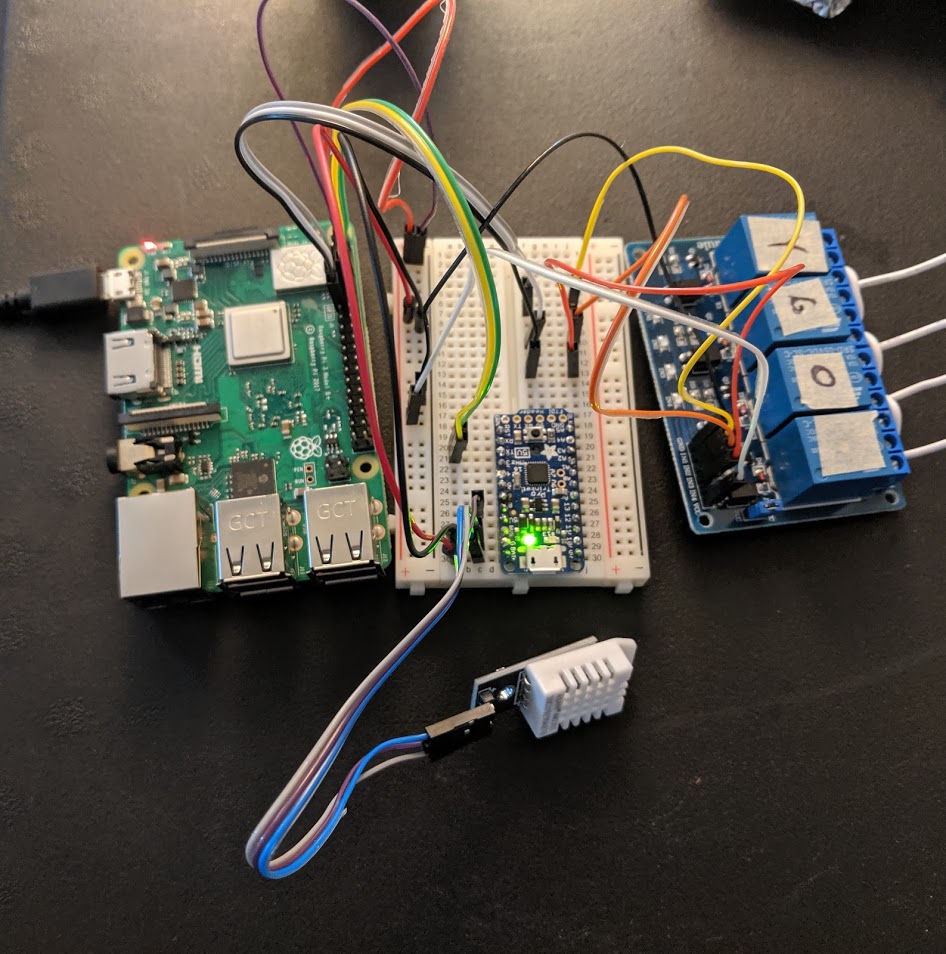
At first, I attempted to read values from the temperature sensor directly from the Pi. Unfortunately, I had no luck with this. Reading from these sensors requires microsecond-precision timing, and since Linux is not a real-time OS, this was too error-prone to be reliable. Instead, I bought a $10 Pro Trinket, which is a tiny and cheap Arduino board. It’s overkill for what it actually does, but it works. The Trinket is connected to the DHT22, continually reads temperature/humidity values, and writes them over serial (UART) to the Pi.
The Pi, therefore, only needed a couple of connections:
- 5V and GND connections to the Trinket and the relay module
- TX/RX UART connections to the Trinket
- GPIO connections to the relay board inputs (GPIO pins 4, 17, and 27)
I also used 18AWG solid copper wire to connect the relays to the wall wiring harness. I chose 18AWG because the pins on the existing thermostat were about 1mm in diameter, so 18AWG would be the best fit to the wall socket. I connected all the common terminals of the relay together to the R wire socket. Then, I connected the Y, G, and O sockets to the normally open (NO) relay terminals 1, 2, and 3, respectively.
After some breadboarding (and plenty of trial and error), the hardware side of things is ready (if not especially pretty)!
Software
You can see the complete project here (please forgive the lack of polish).
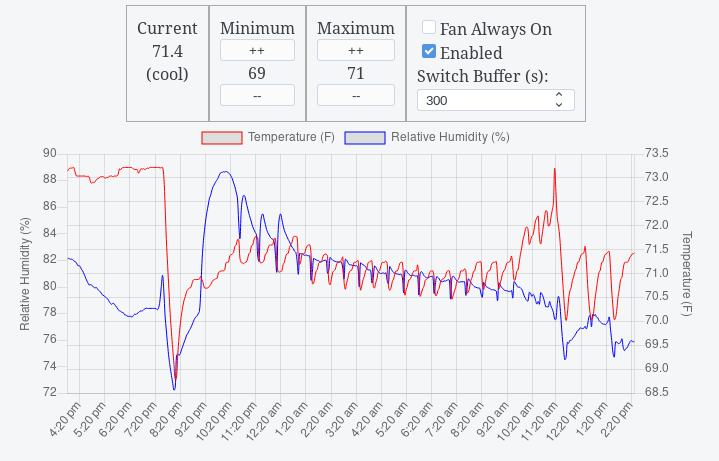
The thermostat needs some sort of control interface, and I opted for a web interface. It’s easier and cheaper than wiring up buttons and a screen, plus, sometimes I don’t want to get up to change the temperature. For this, I reached for a simple Go webserver. This project has one dependency: Chart.js, which I use for showing a graph of temperature and humidity over the past 24 hours or so. Everything else is Go’s standard library and regular old HTML/CSS/JS. Besides the nice graph, there’s some basic control options: minimum and maximum temperature, an option to always have the fan on, an enable/disable option, and a setting for the minimum time between switching state (useful for testing).
There are actually three servers that make up the thermostat software. One is the switch controller, which exposes a REST API for setting the HVAC state (e.g. POST/cool to turn the AC on). Another is the sensor server, which returns the latest sensor data as JSON. The last and biggest one is the management server, which serves up the web interface, controls settings, and decides when to turn the AC/heat/fan on and off.
This microservice-ish approach might be overkill, but it was extremely useful in testing—I could work on the management interface from my desktop, while still being able to read actual sensor data and control actual switches. Additionally, it leaves the option for separate components. It would be pretty easy to set up multiple temperature sensors in different rooms, or run the management server on a device that isn’t stuck to the wall.
Software also makes it possible to compensate for the low-ish resolution of the temperature sensor (0.1°C/0.18°F). If the actual temperature is between 22.1 and 22.2°C, for example, the sensor will alternate between reading as 22.1 and 22.2. Doing some basic averaging over time allows us to get a more accurate measure. You could also use humidity to adjust the target temperature, or get weather data from the internet and do… something… based on it. The possibilities are endless.
Next Steps
This thermostat is up and running, and working well! The graph is pretty, the controls are simple and easy. But there’s obviously room for improvement, especially in terms of appearance. If I wanted to really step it up, I would switch to a Raspberry Pi Zero instead, get a custom PCB printed, and package the whole thing up in a 3D-printed enclosure. It would probably look great! But it would also be a lot of work.
This was a fun project, and I like my thermostat a lot more than I would like a normal smart thermostat. It was cheaper, too—comparable with a regular dumb thermostat, if you don’t count the time spent. The jury is still out on whether or not it will be a good conversation starter, however.